

- Use your seam ripper or scissors to remove all the thread that holds the tie together: remove the tags, backing and any trim stuff. The idea is to turn it into a flat piece of fabric.

- Once all the thread is removed, iron the wide part of the tie so it's flat. Iron and flatten to where the tie gets skinny and remains skinny; leave that alone.

- This part is a little tricky to explain, but the idea is that you want a rectangle that's about 16 inches long. (You may want it shorter or longer depending on your head, but you can figure that out on your next try.) You can make this part as wide as you want. If you're going narrow, remember that you'll lose about a half inch to creating a finished edge on either side. Mine ended up being 16" x 5 1/2" because that's the widest I could make it.

- Trim the edges to get your rectangle.

- Iron down the long sides so it's easier to finish the edge. Nice crisp lines, ladies.
 OR you can do this:
Notice the blue oxford material that the tie silk is now stitched to. I decided to go this route because this particular piece of silk was difficult to work with, plus I liked the effect of the men's oxford shirt with a tie...kinda fun. Anyway, I put the two fronts facing each other, sewed a line down each side, turned it inside out and ironed the seams so it was flat. - For the skinny part of the tie, which will hold the elastic around the back of your head, you'll need 7 to 8 inches. It's easier if it's longer, because a) you can pin it once you've sewn one side and customize the length to your head and b) it's going to bunch around the elastic anyway, so a little extra is no big deal. You can always trim it off.
- Lay the skinny part flat and finish the short edges. It's much easier to do this now than try to tuck 1/4 inch of silk back into the tube while you're sewing...trust me.
- Since you already have the creases in place to use for the skinny part, use em! You'll need to pin the smallest crease to the one on the opposite side (I'm probably explaining this horribly) so when you sew it, you create a tube. (Notice my chalk line in the image below. That's where I want the seam to be.)
 The easiest way to do this, if you have trouble visualizing like me, is to use a small section of skinny tie safety pin it inside out, and then turn it right side out until you get it right. The idea is just that you're sewing the tie shut and you won't have any thread showing when you're done.
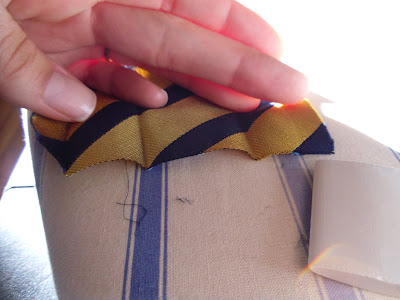


- Back to the top part. Iron some wrinkles into the ends, like this.
 The idea here is that you're creating gathers, so that the headband top can fit cutely into the elastic tube. I find that it's easiest to stick a pin through the wrinkles once you've got them stacked up neatly.
- Now this is one of the tricky parts. You can see from the picture above how things fit together. You tuck the left side into the right side, and sew it all together. FIRST...put your elastic in the tube. My example called for 6 inches at rest, and 8.5 stretched out. (I'll put the measurements below.) That means you need 6 inches of elastic and 8.5 inches of tie tube to house it (so it can stretch). You'll need more tie tube if you didn't finish your seams like I didn't (because they need to be creased and sewed in with everything else).

- The first side is "easy" because you just need to stuff everything in there and sew 'er up. But silk is slippery and elastic can sneak away. You think it's all in there, and then give it a tug, and out comes your elastic. Remember that pins are your friends in this case.
 I used the wheel on my sewing machine to punch the needle through. It's a thick wad of fabric and elastic to go through, so even if you aren't going by hand, go slow.
 - Once the first side is done, pin the other side together with a safety pin and test it to get the tightness right. Then repeat the sewing process with the other side. Make sure you don't have a twist in your headband while you're sewing. Removing all the stitching because of a twist is super annoying.
- Voila!


Tie tube: 9 inches long (width doesn't really matter)
Top piece: 15 inches long x 5.5 inches wide
But remember to adjust for your head size...those are just a starting point. Also, the width of the top piece is variable. You might want a wider wrap, or the option of bunching it up, or whatever. Do what you'd like!
Bunching it up is easier if you don't have a reversible back like mine does. The one pictured here bunches a lot nicer because there's not so much fabric involved.
If you try this project, I hope you share your results. I can't wait to make more of these!
No comments:
Post a Comment